JT's 1987 Shelby Z
S&W 10 Point Roll Cage Install
|
|
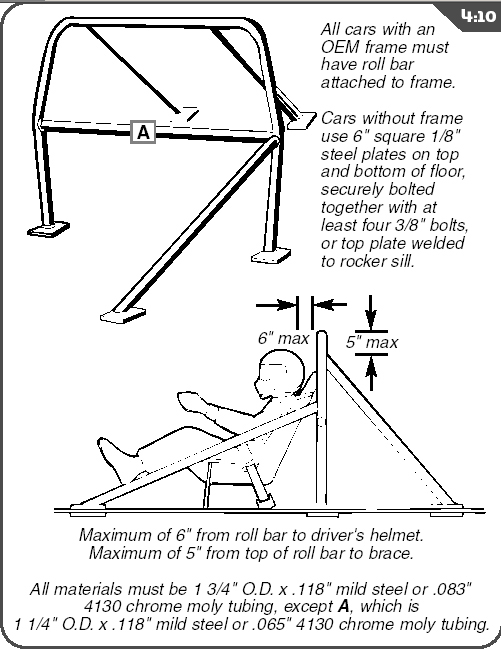
| NHRA rules currently state that any car running an ET in the 1/4 mile of 11.49s or faster must have a roll bar consisting of 5 points minimum. This includes one main hoop (with seat brace bar), two rear hoop support bars, and the driver's door bar. Roll bar kits are typically 6 point (includes passenger door bar) or 8pt (includes 2 more lateral supports to bolster the main hoop. A 10 point roll cage is required for cars running 10.99s or quicker ET's or faster than 135mph trap speed. The 10 point adds a roof hoop, which connects to the top of the main hoop and is supported in the front by two windshield post runners, which connect to the floor near the door bar mounts. On all cars requiring a roll cage, if the OEM firewall has been modified (in excess of 1 square foot for transmission removal, not including bolted-in components) a lower windshield or dash bar of 1 1/4 x .058-inch 4130 chrome moly or 1 1/4 x .118-inch mild steel is mandatory for connecting the forward cage supports. | |
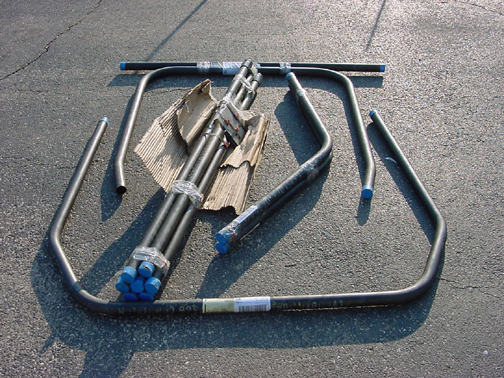
| Since the car doesn't even need a roll bar yet the decision had to be made of which kit to use. The 8 point roll bar uses: 1-3/4"x.118" wall mild steel (.083 4130 Chrome Moly) and the 10 point roll cage uses 1-5/8"x.118" wall mild steel tubing (.083 4130 Chrome Moly). In Chrome Moly, the 10 point cage kit ends up only being about 25lbs heavier than the 8 point bar kit, so with safety in mind, and pipe dreams of one day needing the cooler cage, the 10 point was the choice. The 10 point kit includes the following: one (1) main hoop, two (2) rear braces, one (1) roof hoop, two (2) windshield post runners, one (1) dash brace, one (1) seat brace, two (2) lateral frame support braces, two (2) door bars, and six (6) 6"x6" floor plates. The 10 point kit in chrome moly steel including all the parts and about a pound of filler rod was just over 90 lbs. | |
|
S&W 10 Point Chrome Moly Roll Cage Kit
|
 |
As a safety device, the main hoop of the cage protects the driver from impact. The rear braces and side bars tie the main hoop and chassis together to strengthen the car. From a performance standpoint, the cage will improve your car's traction and performance by greatly reducing chassis flex. This benefit will also increase the useful life of your car. Remember that the quality of your workmanship will have a direct relationship on the ultimate strength of the car's chassis. During the tube fitting phase of the cage construction the notching should be done as careful as possible. If a torch is used, make the initial notch small so that you can completely dress the notch before welding A hand grinder or large bench grinder is slower for the novice, but much more predictable. The notches do not have to be 'airtight'; a small gap is acceptable and will help to maximize penetration during welding. Chamfering each notch will also improve the weld-ability of the fit. During the installation of the roll cage it is critical that the car is not drooping in any way. This condition will remain in the car after the cage has been installed and may create chassis tuning and handling problems. Be careful. While grinding, sawing and welding always wear eye protection. |
|
Quality work requires the proper tools, some tools needed are common hand tools (Wrenches, socket set, screwdrivers, gasket scraper, knives, etc.), measuring/marking tools (tape measure, carpenter's square, level, steel marking pen/pencil), cutting tools (bench grinder, hand grinder, torch, cut-off saw), welder (TIG or MIG acceptable using Argon gas), and safety (water in a spray bottle, metal heat shielding to control excess welding heat, fire extinguisher). Compound Angle Chop Saw |
Miller Synchrowave 250 TIG Welder |
Installation
Steps The first element of a successful installation is to
have a correct overview of the job. Understanding the step ahead of
time will result in an easier better installation. If you are not 100%
confident that you are up for this task, take a step back now and consult
an expert to help you or to do the installation for you. |
|
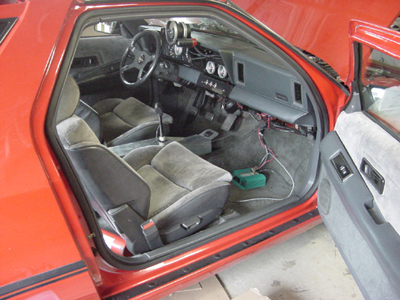
| Preparation Remove the seats, carpets, carpet pads, headliner and any other flammable material. Remove or protect all electrical wires or switches that may be damaged by cutting and welding. It is not always necessary to raise the car for this installation. Whether or not the car is raised it is critical that it be level. If the car is raised it is critical that it is not drooping when any chassis components are installed because any droop will become permanent once the cage is installed and final welded. While leveling and supporting the car, keep an eye on the door alignment, this is a good indicator of whether or not the car is drooping. Be sure to make sure all tubes are installed to your satisfaction BEFORE finish welding | |
|
Before
Prep |
|
 |
|
Interior
Removed |
|
Main
Hoop Installation S&W main hoops are individually designed
for each body style to provide protection to the driver without obstruction
vision. Proper placement of the main hoop is both a safety and appearance
consideration. With the seat installed, and the driver seated with a helmet on, determine the position of the main hoop. It is required that the forward edge of the main hoop be no more than 6 inches from the back of the helmet. Measure from the mounting location on the floor to the roof to determine the height of the main hoop. It may be necessary to cut the bottom on an angle to match the floor contour. After the legs of the main hoop have been cut, the main hoop should be trial fitted, making sure that the top is level. For appearance, try to align the vertical portions of the main hoop with the door pillar or window seam. Check the side-to-side position by measuring from the outer edges of the hoop to the door jam. |
 |
| Once the main hoop position has been determined, remove it from the car. Since we are installing the cage in a unibody car, form two of the floor plates to match the contour of the floor under the area where the main hoop will be located. This can be done by tacking one edge of the plate to the floor, then heating and hammering the plate to match the contour of the stock floor. The mounting location on the floor should be clean, free of paint, carpet glue, sound deadener and rust. Tack weld the main hoop to the floor plates. Recheck the main hoop's position and fit and tack in place. | |
Plate
fitting and welding |
|
| Rear Brace Installation The rear braces connect the main hoop to the rear frame rails or stock floor pan. They should be installed so that they are parallel to each other and located directly over the rear frame rails or sub frame. Place the front of the brace against the main hoop set the back of the brace on the floor above the frame rail and check fit. Install a floor plate between the brae and the floor. The end of the rear braces are pre-cut but you may have to do some final fitting to minimize the gap. | |
| Roof
Hoop Installation One common mistake in cage installations is
to overlook the roof hoop/a-pillar weld. It is critical that all areas
of the upper cage structure get welded. Check the roof hoop for flatness as you did the main hoop. The roof hoop should be installed so that the forward edge is level and pushed up as high into the roof as possible. It should not limit the driver's vision. Measure from the main hoop to where the front edge of the roof hoop will be. Mark the location of the cut to shorten the roof hoop, remember to add approximately 5/8 inch for the depth of the notch before making the cut. Notch the rear of the roof hoop to match the main hoop. If you are working alone, you can hold the roof hoop n place by several methods while you tack it in place. One method is to tie a rope/wire around the hoop and hang it from the roof of the car. If there is a metal roof structure you can also zip-tie the roof hoop to that structure. Another method is to cut a piece of wood and brace the front of the roof hoop. Once the roof hoop is tacked into place, recheck the location and fits. |
|
| Windshield
Post Runner Installation The windshield runner posts support
the front of the roof hoop. Their position has a direct relationship to
the driver's visibility. Space them as far apart as is possible and as
close to the A-pillars (the braces on the side of the windshield) as possible.
The
kit was designed to have the pillars span in front of the dashboard,
however this makes entry and exit of the car more difficult. The bars
almost fit through the dash vents but did not, so the dashboard was
removed with plans to re-install it later. |
|
Dash Crossmember Installation This tube has both performance and safety benefits. From a safety standpoint, this brace supports the door braces and windshield post runners in the event of a side impact. Performance wise, the brace reduces chassis twist, making the car more responsive to tuning changes. The dash crossmember tube spans between the windshield post runners. The height of the tube can be below or behind the dash of the car. This depends on where the windshield post runners are installed. Make sure that the dash brace is level. |
|
Seat Cross Member Installation Next, install the seat crossmember. It is to be installed level and a height that is, not above the driver's shoulder or door brace and no more than 4 inches below them. After determining the height, trial fit it inside of the main hoop. It may be necessary to trim and re-notch one end of the seat crossmember for your application. Note: the bottom notch may have to be bigger than the top. Make sure that the seat brace is level. Tack weld into place Frame Support Installation These braces will improve the chassis reaction time, increase the response to chassis tuning and make the car less flexible. The frame supports span from the seat crossmember/main hoop junction to the frame rails or floor pan, near the suspension mounting points, such as the ladder bar or four link brackets, or in this case to the exhaust tunnel of the unibody. The notch in the seat crossmember/main hoop junction is more complicated than a typical 90 degree notch; take your time if you have to adjust the notch. You may wish to make a paper pattern first, and then transfer the pattern contours to the metal tubing. Once fit, tack weld in place. |
|
| Door
Brace Installation These are the last parts of the cage to be
installed. The door brace is a continual bar that spans from the main
hoop to the forward floor area of the passenger compartment. I used custom
door braces with a bend towards the main hoop side to provide additional
room for the driver. For drag racing, the door brace must pass by the driver at a point between the shoulder and elbow. The driver should be seated in the car to properly locate the door brace. Mark the point where the door brace will be located on the main hoop. Fit the front of the door brace first. With a 10 point cage, the front of the door brace is to be located at the bottom of the windshield post runner where it meets the floor plate. Notch and fit the front of the door brace so that it gets welded to both the floor plate and the windshield post runner. Notch the back of the door brace to fit against the main hoop. Work slowly here, mistakes happen fast on this type of notch. Tack weld door braces in place. |
|
Finish Welding At this time you can do the final welding. If you are doing tin, dashboard or other interior work you may wish to delay final welding of the door braces and rocker bars until the work is finished. It will make getting in and out of the car easier. Also before final welding, make sure that the seats and any other large components will fit into the car with the cage installed. If they do not, you will have to install them before finish welding. During the welding process make sure that you know exactly where the heat of the torch is going. Be sure to use a sheet metal shield as needed so that you do not burn anything that it near the welding. If it is difficult to get access to the floor plates, you can remove the cage pieces as needed to weld those in, or weld them earlier in the process when you know that they are positioned where they need to be. When welding the floor plates be very aware that any undercoating or paint on the underside of the car has the possibility to catch fire. Also make sure that no fuel or brake lines will get torched in the process. You've come this far so you need to be alive till the end to enjoy it! The trick to getting the upper welds complete is to be able to tilt the cage portions where you can work on them. With the door, lateral and seat braces removed you can cut the tack welds between the roof hoop and main hoop and also between the a-pillar posts and rear braces and the floor. This allowed the roof hoop/a-pillar posts sub-assembly to tilt backwards and the main hoop/rear braces to tilt forwards. This allows easier access to all of the upper welds except the roof hoop to main hoop joints, so two out of six of the hard upper ones. Additional gussets and harness mounting tabs can be welded is as needed |
|
Harness Tabs, Interior Fabrication, Wiring, etc. Any interior work that has not been done yet but still needs to be done should be done prior to painting the cage. This will make sure that there is less touch up painting later. It was at this stage that I customized my dash board to fit around the cage and also re-wired my gauges and switches. The Shoulder harnesses need to be bolted to tabs that are welded onto the seat brace bar. I found some pre-fabbed tabs from Competition Engineering so I didnt have to fab my own.
|
|
| Painting
Once the cage is installed you will more than likely want to
paint it so that it does not rust. If you are not a painter and want a
professional finish, consult a paint shop. If you are skilled with spray
cans, continue further. Step one is to clean the cage, floor mounts, etc that will be painted. Next, you will need to mask off the entire interior of the car that you do not want to get painted, so pretty much everything. Masking tape and newspaper (or the fancy brown painters paper) go everywhere. Once cleaned and masked the bare metal cage will need to be primed, I used black primer because the cage was going to be black. Be sure to take extra care when painting in close conditions such as near the roof and when the spray can nozzle is close to the bar because it will spray differently and heavier than you want. Using multiple light coats is key. If there are any imperfections that need to be fixed such as runs, wait till the paint is completely dry and then sand, clean, and re-spray the area. Once successfully primed, it is time to paint. I used Dupli-Color satin black trim paint. Dave Tekampe suggested this stuff and it lays down really well. It may look a little rough when sprayed but then it dries smooth. Paint in the same manner as priming just keep in mind that paint does not dry nearly as fast as primer. Once the paint is dry, double check to make sure that everything is painted properly, touch up spots as needed. Remove the masking and clean everything up.
|
|
Interior Re-Installation and final steps Now that you have a freshly installed and painted cage, the next step is to re-install the interior. Dashboard, steering column, carpet, seats, harnesses, fire extinguisher, etc. that you plan to put back in all need to go back in now. |
|
Dash
Rework & Re-installation |
|
| |
|
| Harness
A quick release 3” shoulder harness meeting SFISpec 16.1
is mandatory in all cars in competition required by teh rules to have
a roll bar or roll cage. The harness must also have a valid expiration
date as they are only good for two years thanks to the roundy-round guys
who let their cars rot outside in the sun during the off season.
Attachement - The lap belts are easy to mount to the factory seat belt anchors in the floor pan. The 5th “anti-submarineing” strap needs to be bolted to the floor using large washers so that the bolt cannot pull through the floorpan. The Shoulder harnesses need to be bolted to tabs that are welded onto the seat brace bar.
|
|
| Padding Roll bar must be padded anywhere driver’s helmet may contact it while in the driving position. (and passengers if seat is installed) Adequate padding must have a minimum of 1/4” compression or meet SFI Spec 45.1. In a 10 point cage, that means that you have to wrap the roof hoop and top on the main hoop near the helmet. Additinally, I added roll bar padding to the door bars thinking that would keep th epaint from getting chipped off. Sold in 3 foot sections, cut and fit as needed and secure with wire ties. |
|
| Finally the 10 point cage is fully installed, the only concern left is making enough power to be able to make the labor worth it! |
|
| |
|


